How Much Does a Drone with Camera Cost? 2024 Price Guide
Commercial UAV Pilot & Aerial Cinematography Specialist at Drone Nestle · FAA Part 107 Remote Pilot Certification, Commercial UAS Operations · 10+ Years in Commercial UAV Operations, Flight Hardware Benchmarking & 4K Aerial Cinematography
A camera drone can cost anywhere from $50 for toy models to over $10,000 for industrial rigs. Most hobbyists find the best value in the $400 to $900 range, which typically includes 4K video, GPS stability, and mechanical gimbals.
🎯 Key Takeaways
- Toy drones under $100 are great for learning but lack professional image stabilization.
- Mid-range drones ($400-$900) provide the best balance of 4K quality and flight safety features.
- Professional camera drones start at $1,500, offering larger sensors and high-bitrate recording.
- Expect to spend an additional 20-30% on batteries, storage, and protective carrying cases.
- Drones over 250g require a $5 FAA registration fee in the United States.
A camera drone can cost you anywhere from $50 to well over $10,000, depending on your specific needs. For the average person looking for clear, stable 4K video, the “sweet spot” usually sits between $400 and $1,200. At this price point, you move away from frustrating toy-grade gadgets and into reliable aircraft that can withstand light wind and stay in the air for 30 minutes or more.

Understanding these costs matters because the drone market is flooded with deceptive marketing. A $100 drone might claim to have a “4K camera,” but without mechanical stabilization, your footage will be shaky and unusable. Knowing exactly what each price tier provides ensures you don’t overpay for pro-level features you don’t need or waste money on a cheap model that lacks the GPS safety features required to keep your investment from flying away.
Price Tier Breakdown: From Budget Toys to Professional Rigs
The drone market is strictly segmented by performance, and you generally get exactly what you pay for. Price jumps are usually tied to the quality of the camera sensor, the complexity of the stabilization system, and the reliability of the flight controller.

Entry-Level and Toy Drones ($50 – $250)
Drones in this category are primarily for learning the basic physics of flight. While they often include a camera, the quality is usually limited to 720p or 1080p. These drones lack a mechanical gimbal, meaning every tilt and vibration of the drone is reflected in your video. You are essentially buying a flying webcam.
- Flight Time: 8 to 15 minutes per battery.
- Range: Limited to 50–100 meters (usually via a weak Wi-Fi signal).
- Stability: Very poor in wind; often lacks GPS for “Return to Home” safety.
- Best for: Indoor practice, kids, and low-stakes fun.
The Prosumer Sweet Spot ($400 – $900)
This is where most hobbyists and social media creators should start. In this range, you find reputable brands like DJI and Autel. These drones feature GPS-assisted flight, which allows the drone to hover perfectly in place even if you let go of the sticks. Most importantly, they include 3-axis mechanical gimbals that keep your footage level even when the drone is banking sharply.
- Flight Time: 25 to 34 minutes.
- Camera: 4K resolution with high bitrates and larger sensors for better low-light performance.
- Range: 5 to 10 kilometers using dedicated radio transmission technology.
- Best for: Travel vlogging, family photos, and high-quality recreational filming.
High-End and Professional Models ($1,200 – $2,500+)
Once you cross the $1,200 mark, you are paying for professional-grade imaging and advanced safety. These drones often feature Omnidirectional Obstacle Avoidance, using sensors on all sides to prevent crashes. The cameras in this tier can often shoot in 5.4K or Apple ProRes formats, providing the dynamic range needed for professional color grading in post-production.
- Flight Time: 35 to 45+ minutes.
- Special Features: Larger 1-inch (or even Micro Four Thirds) sensors, dual-camera systems with telephoto lenses, and high-speed tracking.
- Best for: Real estate photography, commercial film sets, and serious content creators.
The Ultimate Drone Pricing Walkthrough
Determining how much a drone with a camera costs is not as simple as checking a single price tag; it requires a deep dive into your specific needs, the technology required to meet those needs, and the hidden costs that often catch beginners off guard. This guide provides a systematic approach to evaluating the market, understanding technical specifications that drive price, and calculating a realistic total cost of ownership. Whether you are looking for a toy for a child or a professional tool for cinematography, following these steps will ensure you don’t overspend on features you don’t need or underspend on a device that fails to meet your expectations.
Step 1: Identify Your Primary Use Case
What you need: A notepad, a clear goal for your drone usage, and an honest assessment of your piloting skills.
Instructions: Before looking at prices, you must categorize yourself into one of four tiers: Toy/Educational, Hobbyist/Traveler, Prosumer, or Professional. Toy drones usually cost under $150 and are meant for indoor flying or short-range fun. Hobbyist drones, typically ranging from $300 to $800, offer stabilized 4K video and GPS features. Prosumer models ($1,000 to $2,500) provide larger camera sensors and better obstacle avoidance. Professional enterprise drones can exceed $5,000. Clearly defining your “mission”—such as real estate photography, racing, or casual backyard flying—will narrow your price bracket immediately and prevent “feature creep” where you pay for high-end tech you will never use.
Pro Tip: If you are a complete beginner, budget for a $50 “sacrificial” drone first. Learning to fly without GPS assistance on a cheap model will save you from crashing a $1,000 investment during your first week.
Step 2: Evaluate Camera and Gimbal Specifications
What you need: Basic knowledge of video resolutions (1080p, 4K) and sensor sizes (1/2.3-inch vs. 1-inch).
Instructions: The “camera” part of the drone is the primary price driver. Drones under $200 often have “fixed” cameras, meaning the video will be shaky because it moves with the drone’s body. To get professional-looking footage, you need a mechanical 3-axis gimbal. Look for drones that specify “3-axis stabilization.” Furthermore, examine the sensor size. A 1/2.3-inch sensor is standard for mid-range drones, while a 1-inch sensor is the gold standard for high-quality photography, especially in low light. If you only plan to share clips on social media, a $400 drone with a small sensor is sufficient. For commercial work, expect to pay at least $1,000 for a drone with a high dynamic range and adjustable aperture.
Pro Tip: Don’t be fooled by “4K” labels on cheap drones. A $100 drone claiming 4K usually uses software upscaling and lacks a gimbal, resulting in “jello effect” footage that is virtually unusable.
Step 3: Analyze Flight Time and Battery Costs
What you need: A calculator and a target “session length” (how long you want to stay in the air).
Instructions: When calculating drone costs, you are really buying flight minutes. Entry-level drones fly for 8–12 minutes per battery, while mid-to-high-end drones fly for 25–45 minutes. However, these advertised times are usually “ideal conditions” (no wind). In reality, you should subtract 20% from the advertised time. Most pilots require at least three batteries for a productive outing. Since individual “Intelligent Flight Batteries” for quality drones cost between $60 and $200 each, this can significantly increase the total price. Factor in the cost of a multi-battery charging hub if it is not included in the base package, as charging three batteries sequentially with a single cable can take several hours.
Pro Tip: Look for “Combo” or “Fly More” packages. Manufacturers often bundle two extra batteries, a case, and a charger for about 20% less than it would cost to buy those items separately later.
Step 4: Factor in Transmission Range and Controller Types
What you need: An understanding of your flying environment (urban vs. rural) and smartphone compatibility.
Instructions: The technology used to send the camera’s image back to your controller impacts the price. Cheap drones use standard Wi-Fi, which often cuts out or lags beyond 100 meters, especially in areas with high interference. Higher-end drones use proprietary radio transmission (like DJI’s OcuSync or Autel’s SkyLink) that can maintain a clear 1080p feed for several kilometers. Additionally, decide if you want a controller that uses your smartphone as a screen or a “Smart Controller” with a built-in high-brightness display. Drones bundled with built-in screens usually cost $200–$400 more than those that require a phone, but they offer faster setup times and won’t drain your phone’s battery.
Pro Tip: If you live in a city, prioritize drones with “dual-band” transmission (2.4GHz and 5.8GHz) to avoid signal interference from home Wi-Fi routers, which can cause cheap drones to lose connection easily.
Step 5: Account for Mandatory Legal and Safety Expenses
What you need: Knowledge of local aviation authority (FAA in the US) regulations and safety gear.
Instructions: The cost of a drone isn’t just the hardware. In the United States, if your drone weighs 250 grams or more, you must register it with the FAA ($5 for three years). If you intend to use the drone for any business purpose (even just monetizing a YouTube channel), you must pass the Part 107 remote pilot exam, which costs approximately $175 per attempt. Additionally, safety gear is a hidden cost. A landing pad ($20) protects the gimbal from tall grass and dust, while a high-quality microSD card (V30 speed class or higher) is required to record 4K footage without errors, costing about $25–$50 for 128GB.
Pro Tip: Choose a drone weighing under 249 grams (like the DJI Mini series) if you want to avoid FAA registration for recreational use and benefit from more lenient flying regulations in many countries.
Step 6: Research Insurance and Long-Term Maintenance
What you need: An estimation of your “risk tolerance” and research into manufacturer protection plans.
Instructions: Drones are prone to crashes, flyaways, and hardware failures. Most standard warranties do not cover pilot error. You should budget for a crash protection plan, such as DJI Care Refresh or Autel Care. These plans usually cost 10–15% of the drone’s retail price annually and provide 1–2 replacements for a small deductible if you wreck the craft. Furthermore, propellers are consumable items. A set of four propellers costs $10–$20, and you should replace them at the first sign of a chip or crack. If you fly frequently, expect to spend $50 annually on prop replacements and basic cleaning supplies to keep the motors free of debris.
Pro Tip: Check if your homeowners or renters insurance offers a “Personal Articles Floater.” It might be cheaper than manufacturer insurance for covering theft or loss of high-end drone equipment.
✅ Final Checklist
- Verified the drone includes a 3-axis mechanical gimbal for stable video.
- Calculated the total price including at least two extra batteries and a charging hub.
- Confirmed the drone’s weight to determine if FAA registration ($5) is required.
- Included the cost of a high-speed (V30/U3) microSD card for 4K recording.
- Allocated budget for a protection plan or insurance to cover potential crashes.
Important Notes:
- Safety First: Never fly near airports, over crowds, or beyond your visual line of sight. Check apps like B4UFLY or AirControl for local no-fly zones.
- Professional Help: If purchasing for specialized work like thermal imaging or 3D mapping, consult with an enterprise drone dealer, as these systems require specific calibrations.
- Estimated Time: Researching and purchasing takes 3–5 hours; initial battery charging and firmware updates take 2–4 hours.
- Cost Range: Beginner: $150–$400 | Intermediate: $500–$1,200 | Professional: $2,000+.
Features vs. Investment: What Different Price Points Actually Buy
To justify the jump in price, you need to look at the hardware hidden beneath the plastic shell. A common mistake is assuming that “4K” is the only metric that matters. In reality, a $200 drone and a $1,000 drone might both claim 4K resolution, but the resulting videos will look nothing alike.

Stabilization: The Real Price Driver
The biggest difference between a $200 drone and a $1,000 drone is how the camera handles movement. Cheap drones use Electronic Image Stabilization (EIS), which crops into the image to digitally “smooth” shakes. This often results in a blurry, “jello-like” effect. A $1,000 drone uses a physical 3-axis gimbal—a motorized mount that counteracts every movement of the drone in real-time. This produces the buttery-smooth, cinematic look you see in professional travel videos.
Transmission Systems and Safety
When you spend more, you are buying peace of mind. A $200 drone usually connects to your phone via standard Wi-Fi. If you fly more than 100 feet away or near a building, the video feed will likely stutter or cut out entirely. A $1,000 drone uses proprietary transmission (like DJI’s OcuSync). This provides a crisp, high-definition live feed even when the drone is miles away. Additionally, higher-priced drones include sophisticated “Return to Home” (RTH) features. If the battery gets low or the signal drops, the drone uses GPS to automatically fly back to its exact takeoff point and land itself.
Hardware Comparison At a Glance
- The $200 Drone: Plastic gears, 1080p fixed camera, 10-minute flight time, no obstacle sensors, prone to “flyaways” in wind.
- The $1,000 Drone: Brushless motors, 4K/60fps camera on a 3-axis gimbal, 31-minute flight time, sensors that stop the drone before it hits a tree, and rock-solid GPS positioning.
If you are serious about capturing footage you actually want to share, the value of the $1,000 investment far outweighs the cost of replacing multiple $200 drones that crashed or produced unusable video. The extra money buys you the software and hardware necessary to focus on the art of photography rather than the stress of not crashing.
The Total Cost of Ownership: Hidden Expenses and Essential Accessories
Buying the drone is just the first step of your aerial journey. Many new pilots are surprised to find that the “sticker price” doesn’t cover everything needed for a successful flight day. To truly understand how much a drone costs with a camera, you have to look at the total cost of ownership over the first year. These “hidden” expenses ensure your drone stays in the air and your footage looks professional.
Batteries and Power Management
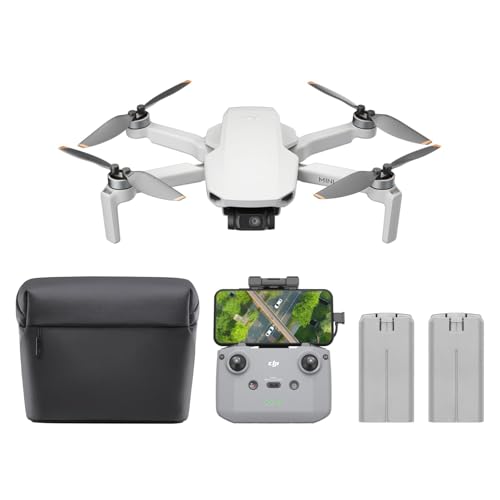
Most consumer drones advertise flight times between 25 and 35 minutes. However, in real-world conditions with wind and safety margins, you often get about 20 minutes of actual filming time. To spend a meaningful afternoon at a location, you will need at least two or three batteries. Many brands offer “Fly More” or “Premium” bundles that include extra batteries and a multi-charger. While these bundles add $150 to $400 to the initial price, they are almost always cheaper than buying the accessories individually later.
Safety, Storage, and Care
Beyond power, you need to protect your investment and your data. High-resolution 4K video generates massive files, meaning you cannot use an old, slow microSD card. You will need high-speed U3 or V30 rated cards to prevent recording errors. Consider these common additional costs:
- Fast MicroSD Cards: Expect to spend $30–$70 for reliable 128GB or 256GB cards.
- ND Filters: Think of these as sunglasses for your drone. They are essential for achieving that “cinematic” look in bright sunlight, costing between $50 and $150.
- Crash Insurance: Programs like DJI Care Refresh offer replacement units for a small fee if you crash. These plans typically cost $50–$250 per year depending on the drone’s value.
- Landing Pads and Cases: A simple folding landing pad ($15–$30) protects your camera gimbal from dust and tall grass during takeoff.
Market Comparison: Best Value Camera Drones for Every Budget
The drone market has matured significantly, meaning you no longer have to spend thousands of dollars to get a stable, high-quality camera. However, the gap between a “toy” and a “tool” is still defined by the price point. Here is how the current market stacks up for 2024, focusing on models that offer the best bang for your buck.
The Entry-Level Sweet Spot (Under $500)
For beginners, the sub-250g category is the gold standard. These drones are lightweight enough to avoid many complex regulations while still packing impressive tech. The DJI Mini 4K is currently one of the best values on the market, providing 4K stabilized video for around $300. If you want a bit more software intelligence, the Potensic Atom offers a three-axis gimbal and 4K footage at a similar price point, making it a strong alternative for those on a strict budget.
Prosumer and High-End Performance ($800–$2,000+)
When you move into the mid-range, you aren’t just paying for a better camera; you are paying for safety and reliability. Drones in this bracket features “Omnidirectional Obstacle Sensing,” which makes it nearly impossible to crash into trees or walls. This is where you find the workhorses of the industry.
- Best Overall Value: The DJI Mini 4 Pro (approx. $750–$1,100). It features pro-level video specs, vertical shooting for social media, and incredible safety sensors.
- The Hobbyist’s Dream: The DJI Air 3 (approx. $1,100–$1,500). This model features a dual-camera system, allowing you to switch between a wide-angle and a telephoto lens mid-flight.
- Professional Cinematography: The DJI Mavic 3 Pro ($2,100+). This is the choice for creators who need a Hasselblad camera and Apple ProRes capabilities for high-end commercial work.
Conclusion
Determining how much a drone with a camera costs depends entirely on your creative goals. If you are a casual hobbyist, a budget of $300 to $500 will get you a reliable 4K machine that fits in your pocket. However, if you are looking for professional-grade safety features and cinematic image quality, the “sweet spot” typically sits between $800 and $1,200 when including essential accessories like extra batteries and insurance.
To take your next step, start by identifying your primary use case. Are you filming family vacations or starting a real estate photography business? Once you know your goal, choose a model that offers the best safety sensors within your budget to protect your investment. Happy flying, and enjoy the view from above!
❓ Frequently Asked Questions
What determines the price of a camera drone?
The primary price drivers are sensor size (e.g., 1/2-inch vs. Full Frame), the presence of a 3-axis mechanical gimbal, obstacle avoidance sensors, and transmission range. Higher-priced drones also offer better wind resistance and longer flight times.
Can I get a 4K camera drone for under $200?
While some drones under $200 claim 4K resolution, they often lack a mechanical gimbal, resulting in ‘shaky’ footage. True, stabilized 4K cinematography usually begins at the $350-$400 price point.
What are the recurring costs of owning a camera drone?
Beyond the initial purchase, you should budget for propeller replacements, SD cards (V30 speed or higher), FAA registration every three years, and potentially premium editing software or cloud storage.
How much does a professional cinematography drone cost?
Professional rigs like the DJI Mavic 3 Pro or Autel Evo II Pro cost between $2,000 and $5,000, while high-end Hollywood-grade heavy lifters can exceed $15,000 including lenses.
Is it cheaper to buy a drone bundle?
Yes, ‘Fly More’ combos or bundles usually save you 15-20% compared to buying extra batteries, a charging hub, and a carrying case separately.
Do camera drone prices drop frequently?
Prices generally remain stable until a new model is announced, at which point the previous generation often sees a 15-25% discount or becomes available as a certified refurbished unit.

Similar Posts