Mastering Drone Light Shows: How to Sync Swarms & Tech
Commercial UAV Pilot & Aerial Cinematography Specialist at Drone Nestle · FAA Part 107 Remote Pilot Certification, Commercial UAS Operations · 10+ Years in Commercial UAV Operations, Flight Hardware Benchmarking & 4K Aerial Cinematography
Centimeter-level precision via RTK GPS and specialized swarm orchestration software are the non-negotiable foundations of any professional display. Success requires integrating 3D animation workflows with strict regulatory compliance to manage dozens of aircraft simultaneously and safely.
🎯 Key Takeaways
- Use RTK GPS to achieve the centimeter-level accuracy required for tight formations.
- Select drones equipped with specialized swarm-capable flight controllers and high-intensity LEDs.
- Design animations in 3D software like Blender before converting them to flight paths.
- Secure FAA Part 107.35 waivers for operating multiple aircraft simultaneously.
- Implement redundant geofencing to mitigate risks of signal interference or flyaways.
To execute a professional drone light show, you must move beyond manual flight and transition into autonomous swarm orchestration. The core of this process relies on a Ground Control Station (GCS) that communicates with hundreds of individual nodes via a high-speed telemetry link. Instead of a pilot for every aircraft, a single computer manages the entire formation using synchronized flight paths generated in specialized animation software. This technical synergy allows you to treat a fleet of drones as a single, coherent 3D display in the sky.


Understanding the technical stack is non-negotiable for safety and visual fidelity. You aren’t just managing drones; you are managing a high-density data environment. Centimeter-level positioning (RTK) and millisecond-latency communication protocols determine whether your show is a masterpiece or a multi-drone collision. If you want to master this technology, you must focus on the infrastructure that allows these machines to “talk” and “see” each other with absolute precision.
The Role of RTK GPS and Swarm Communication Protocols
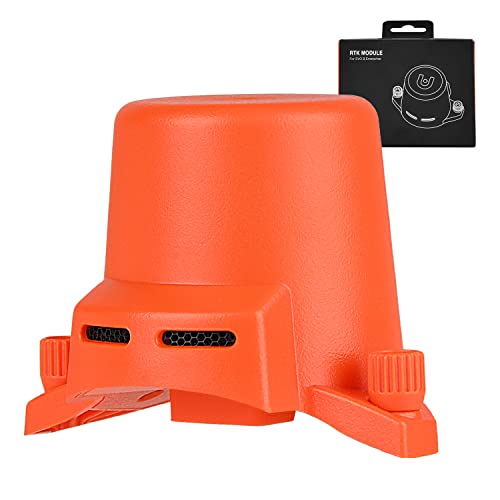


Standard GPS is insufficient for light shows. While a consumer drone might hover within a 3-meter radius, swarm drones require centimeter-level precision to maintain tight formations without colliding. This is achieved through Real-Time Kinematic (RTK) positioning. An RTK system uses a static base station on the ground that observes satellite signals and calculates atmospheric interference and timing errors in real-time. It then broadcasts these corrections to the “rovers” (the drones), allowing them to lock their position with roughly 1 to 3 centimeters of horizontal accuracy.


Centimeter-Level Precision via RTK Base Stations
Without RTK, a drone swarm would look like a blurry cloud rather than a sharp logo or 3D shape. The base station acts as the absolute source of truth for the entire fleet. It compares its known physical location with the GNSS data it receives from satellites, then sends a correction stream—usually via the RTCM protocol—to every drone in the air via a dedicated radio link.
- Dual-Band GNSS: Modern light show drones use L1 and L2 frequencies simultaneously to reduce signal acquisition time and improve reliability near tall buildings.
- High Refresh Rates: Positioning data must refresh at 5Hz to 10Hz. This ensures smooth movement during high-speed transitions and prevents “jitter” in the animation.
- Heading Accuracy: Many professional swarms use dual-antenna setups on each drone. This provides a constant heading (yaw) even when the drone is stationary, bypassing the interference issues common with traditional magnetic compasses.
Swarm Logic and Communication Protocols


The “swarm” is not a single entity but a collection of intelligent agents following a synchronized clock. Communication typically happens via 2.4GHz or 5.8GHz Wi-Fi, or 900MHz long-range radio for higher reliability in RF-congested environments. The Ground Control Station (GCS) sends “heartbeat” packets to ensure every drone is healthy and in its assigned “slot.”


Most systems utilize the MAVLink protocol for communication. This lightweight messaging system allows the GCS to monitor battery voltage, GPS health, and internal temperature for 500+ drones simultaneously. If a drone misses a specific number of data packets or drifts more than 50cm from its calculated path, the swarm protocol triggers an automated safety response. This usually involves a vertical climb or a direct return-to-home (RTH) sequence to exit the formation safely.
From Start to Finish: Drone Light Shows Explained
Creating a drone light show is a complex fusion of art, engineering, and aviation. This guide covers the essential phases of producing a professional-grade aerial performance, from initial concept design and legal compliance to the technical execution of a multi-drone fleet. Following these steps meticulously is vital for ensuring both the visual impact of the show and the safety of the crew and audience. Whether you are aiming to launch ten drones or two hundred, the principles of synchronization, precision positioning, and safety protocols remain the same.
Step 1: Regulatory Compliance and Mission Planning
What you need: FAA Part 107 license (or local equivalent), specialized waivers for night operations and flying over people, and comprehensive liability insurance.
Instructions: Before touching a drone, you must secure the legal right to fly. In the United States, this means obtaining an FAA Part 107 certificate. Because light shows happen at night and often near crowds, you must apply for specific waivers (like the 107.29 daylight operation waiver or 107.39 flight over people waiver). Simultaneously, conduct a site survey. Identify a “Launch Area” (flat, clear terrain) and a “Performance Area” (the airspace where drones will dance). Ensure the site is at least 5 miles away from airports unless you have prior ATC authorization. Document your safety plan, including emergency landing zones and “geofence” boundaries to prevent drones from straying beyond the designated flight volume.
Pro Tip: Use a specialized app like B4UFLY or Skyward to check for Temporary Flight Restrictions (TFRs) in your area weeks in advance, as high-profile events often trigger unannounced airspace closures.
Step 2: Selecting and Preparing the Drone Fleet
What you need: A fleet of swarm-capable drones (e.g., UVify IFO, Bitcraze Crazyflie for indoors, or custom PX4 builds), high-intensity RGBW LEDs (at least 10-20 Watts), and high-capacity LiPo batteries.
Instructions: Unlike standard photography drones, light show drones are stripped of cameras to save weight and are equipped with ultra-bright LEDs capable of millions of color combinations. You need drones that support RTK (Real-Time Kinematic) GPS, which provides centimeter-level positioning accuracy—standard GPS is too imprecise for tight formations. Inspect each drone for structural integrity, ensuring propellers are tightened and the LED diffusers are clean. Number each drone clearly on its chassis. This “ID” corresponds to its specific path in the choreography software. Ensure your batteries are balanced-charged to 100% and labeled according to their cycle count to avoid using a degrading battery in a critical flight.
Pro Tip: Always carry 20% more drones than the show requires; hardware failures are common, and having “hot spares” ready on the ground allows you to maintain the visual integrity of the show.
Step 3: Choreography Design and Animation
What you need: 3D animation software (Blender, Maya, or 3ds Max), a drone show plugin (like Drone Show Software by SPH Engineering), and a clear storyboard.
Instructions: Treat the sky as a 3D canvas. Using animation software, create “keyframes” for each drone. You must maintain a minimum “safety distance” between drones—typically 1.5 to 3 meters—to prevent mid-air collisions caused by prop-wash or wind gusts. The software will calculate the individual trajectories (waypoints) for every drone in the fleet. Export these paths as script files that include coordinate data (X, Y, Z) and color data (R, G, B, Intensity) for every fraction of a second. Run a “Collision Check” algorithm within your software to identify any points where drones get too close. The animation must account for the time it takes for drones to transition from the launch pad to the first formation.
Pro Tip: Avoid rapid vertical descents in your choreography; drones descending into their own “dirty air” (vortex ring state) can become unstable and wobble or fall.
Step 4: Ground Control Station (GCS) Setup
What you need: A high-performance laptop, a long-range Wi-Fi router (2.4GHz or 5.8GHz), a dedicated RTK Base Station, and an uninterruptible power supply (UPS).
Instructions: The Ground Control Station is the “brain” of the operation. Set up your RTK Base Station on a tripod in a location with a clear view of the sky. This station sends correction data to the drones to achieve centimeter-level precision. Connect your laptop to a high-gain industrial router to establish a local network. This network transmits the flight scripts to the drones and receives real-time telemetry (battery voltage, GPS lock, altitude). Place your GCS at least 30 meters away from the launch grid to ensure a clear line of sight. Ensure your laptop is plugged into a UPS; a power surge or accidental unplugging during the show could result in a total loss of control over the fleet.
Pro Tip: Use a dual-band router setup to minimize interference, especially in urban environments where local Wi-Fi signals can be congested and “noisy.”
Step 5: Setting the Launch Grid and Calibration
What you need: Measuring tape or a laser rangefinder, “Launch Pads” (fire-resistant mats), and a level ground surface.
Instructions: Layout your drones in a precise grid pattern. The distance between drones on the ground should mirror the starting positions in your software (usually 1.5 to 2 meters apart). Each drone must be placed facing the exact same heading (usually True North) to ensure their internal compasses are aligned. Once placed, power on the drones one by one and verify that the Ground Control Station recognizes each unique ID. Perform an IMU and Compass calibration for the fleet if you have moved to a new geographic location. This step ensures that when the “Takeoff” command is sent, every drone moves in the correct relative direction without drifting into its neighbor.
Pro Tip: Use a “Total Station” surveying tool for the most accurate grid layout, as even a 10cm error on the ground can lead to instability during the initial ascent phase.
Step 6: Pre-Flight Simulation and Safety Checks
What you need: Simulation environment within your GCS software and a handheld anemometer (wind gauge).
Instructions: Before launching, run a “Virtual Show” in your GCS. This simulates the physics of the flight without the drones actually moving. Check for “Return to Home” (RTH) altitudes and geofence triggers. Check the wind speed at ground level and, if possible, at the performance altitude using a weather drone. Most light show drones have a wind tolerance of 8 meters per second (approx. 18 mph). If gusts exceed this, postpone the show. Conduct a “Light Check” where all drones on the ground pulse through Red, Green, and Blue to ensure all LED modules are functioning. Finally, verify that every drone has a “Green” status for GPS satellites (usually requiring at least 12-18 satellites for RTK lock).
Pro Tip: Always designate a “Kill Switch” operator—a person whose sole job is to trigger an emergency landing or “flight termination” if a drone breaches the safety perimeter.
Step 7: Mission Execution and Monitoring
What you need: A primary pilot-in-command (PIC) and multiple visual observers (VOs).
Instructions: Initiate the launch sequence through the GCS. Professional software typically uses a synchronized “Arm and Takeoff” command. As the drones ascend, the PIC monitors the telemetry dashboard for warnings, specifically looking for battery voltage drops or “GPS Lost” errors. Visual observers should be positioned around the flight perimeter to watch for birds, unauthorized aircraft, or drones that may be “drifting” out of formation. During the show, the drones follow the pre-loaded scripts autonomously. The PIC must be ready to take manual control or trigger a “Return to Launch” for any individual drone that behaves erratically. Once the show concludes, the drones will automatically return to their coordinates on the launch grid.
Pro Tip: Record the flight telemetry logs. If a drone performs poorly, the logs will tell you if it was a mechanical failure, a software glitch, or environmental interference.
Step 8: Post-Flight Recovery and Maintenance
What you need: Battery fire-safe bags, microfiber cloths, and a digital logbook.
Instructions: After the drones land, wait for the motors to cool before handling. Power down each drone and immediately remove the batteries. Inspect the propellers for any nicks or “leading edge” wear caused by dust or insects. Clean the LED diffusers to ensure maximum brightness for the next performance. Log the flight time and battery usage for each drone ID; this helps in predicting motor or ESC (Electronic Speed Controller) failure before it happens. Store the batteries at a “Storage Voltage” (typically 3.8V per cell) rather than leaving them fully charged, as this prevents swelling and capacity loss. Pack the drones in shock-resistant flight cases to protect the sensitive RTK antennas during transport.
Pro Tip: Use a color-coded sticker system on your batteries: Green for ready, Red for empty, and Blue for storage mode, to prevent confusion during high-pressure back-to-back shows.
✅ Final Checklist
- All FAA/Local aviation waivers and permits are approved and on-site.
- RTK-GPS fix is “Fixed” (centimeter precision) for 100% of the fleet.
- Wind speeds have been verified below the manufacturer’s safety threshold.
- Collision-free trajectory has been verified through 3D simulation.
- Geofence and emergency “Kill Switch” protocols are active and tested.
Important Notes:
- Safety first: Never fly directly over an unprotected audience. Always maintain a “buffer zone” of at least 30-50 meters between the performance area and the crowd.
- Seek professional help: If you are planning a show with more than 20 drones, consider hiring a certified “Fleet Lead” or a specialized drone show consultant.
- Estimated Time and Cost: A small DIY show (10 drones) can take 50+ hours of prep and cost $15,000 – $30,000 in hardware. Professional displays often cost $10,000 to $50,000 per event depending on the drone count.
Essential Hardware Specifications for Light Show Drones


You cannot use off-the-shelf consumer drones for professional shows. Light show drones are purpose-built “flying pixels.” They are stripped of cameras, gimbal systems, and heavy sensors to make room for high-intensity lighting and high-speed flight controllers. Every component is optimized for weight, visibility, and flight duration.


High-Intensity RGB LEDs and Diffusion


The defining feature of a light show drone is its lighting system. Most professional units utilize a 10W to 15W RGBW LED array capable of producing millions of colors. This is significantly more powerful than the navigation lights found on standard drones.
- Nits and Lumens: The LEDs must be bright enough to be visible from several miles away, even against city light pollution.
- Diffusion Domes: Specialized frosted domes are used to scatter the LED output. This makes the drone look like a solid point of light rather than a small circuit board.
- Strobe Capabilities: The hardware must support rapid-fire pulsing for “sparkle” effects. This requires a high-speed LED driver integrated directly into the drone’s flight controller.
Lightweight Frames and Redundant Power


Every gram counts when trying to maximize show time. Most show drones weigh between 300g and 600g. A lighter drone is not only safer if a failure occurs, but it also allows for more aggressive maneuvers and longer durations. A typical show lasts 10 to 15 minutes, but the hardware must provide a 5-minute safety buffer for landing.
- Propeller Guards: These are mandatory. They prevent a minor “bump” between two aircraft from resulting in a catastrophic double-crash.
- Integrated Flight Controllers: Systems like the Orange Cube or custom Pixhawk variants provide the processing power needed to handle RTK data and swarm commands simultaneously.
- High-Speed ESCs: Electronic Speed Controllers must be capable of rapid motor adjustments. This is critical for maintaining a rigid formation during wind gusts up to 18 mph.
Regulatory Frameworks and Safety Compliance Requirements


Before the first LED flickers to life, you must navigate the complex landscape of aviation law. Organizing a drone light show isn’t just about the technology; it’s about operating a coordinated swarm within shared airspace. Regulatory bodies like the FAA in the United States or EASA in Europe view a swarm as a high-risk operation because a single pilot is controlling multiple aircraft simultaneously, which typically requires special waivers.
Airspace Permissions and Part 107 Waivers
In most regions, standard commercial drone licenses only cover “one pilot, one drone” operations. To scale up, you will likely need a multi-drone waiver (such as FAA 107.35 in the U.S.). This process requires proving that your system has the technological “failsafes” to prevent a mass flyaway. For example, if the ground control station loses its link, every drone must have a pre-programmed command to either hover in place or return to a specific home point without colliding with its neighbors.
- Geofencing: Always implement multi-layered virtual “cages” to ensure drones cannot drift into active flight paths or over crowds.
- Liability Insurance: Professional light shows often require specialized aviation insurance with coverage starting at $5 million to $10 million depending on the venue size.
- Visual Observers (VOs): Even with automation, having human observers to monitor the “kill switch” and check for low-flying manned aircraft is a mandatory safety layer.
Site Safety and Spectator Buffers
The “drop zone” is the area directly beneath the flight path where no spectators are allowed. Compliance involves calculating the maximum drift distance based on wind speeds and altitude. A practical tip is to maintain a buffer zone of at least 1.5 times the maximum flight altitude between the drones and the front row of the audience. This ensures that even in a total power failure, the hardware lands safely away from people.


Software Ecosystems for 3D Choreography and Path Planning


The magic of a drone light show happens long before the drones leave the ground. The “brain” of the operation is the software ecosystem that translates a creative vision into billions of coordinates. Modern shows rely on a two-tier software stack: creative animation tools and path-planning engines. These systems must communicate perfectly to ensure that “Drone 42” and “Drone 87” don’t try to occupy the same cubic inch of space at the same time.
From 3D Animation to Telemetry
Most choreographers start in professional 3D suites like Blender or Autodesk Maya. Here, each drone is treated as a “vertex” or a point of light. The software allows you to morph a 3D company logo into a sparkling Christmas tree by calculating the smoothest path for every individual unit. The critical tech here is the “export plugin” that converts these visual keyframes into CSV or XML files that the drone’s flight controller can understand.
- Collision Avoidance Algorithms: Software like Drone Show Software by SPH Engineering runs thousands of simulations to detect “near-misses” in the choreography.
- Refresh Rates: High-end shows sync at 10-20 position updates per second to ensure fluid motion that looks like a movie screen in the sky.
- Color Grading: Advanced software allows for 16 million color combinations, enabling smooth gradients and “shimmer” effects across the swarm.
The Ground Control Station (GCS)
The GCS is the mission control of your show. It doesn’t just “hit play”; it monitors the telemetry of every single battery, GPS lock, and motor temperature in real-time. If a single drone’s battery voltage drops below a safety threshold, the software can automatically “retire” that specific unit, sending it back to land while the rest of the swarm adjusts to maintain the integrity of the image. This level of dynamic path planning is what separates professional-grade shows from hobbyist experiments.
Conclusion
Mastering a drone light show is a perfect marriage of artistic creativity and rigorous engineering. While the visual impact is breathtaking, the true success of a show lies in the invisible infrastructure: the robust RTK GPS signals, the redundant safety protocols, and the sophisticated software that keeps hundreds of units in perfect harmony. By understanding the regulatory landscape and investing in a reliable software ecosystem, you move from simply flying drones to orchestrating a symphony in the sky.
Ready to take the next step? Start by experimenting with 3D animation software to visualize your first swarm, and look into obtaining your commercial drone waivers early. The sky is no longer the limit—it’s your canvas. Get out there and start lighting it up!
💬 Quick Questions & Answers
Can I use a standard DJI Mavic for drone light shows?
No, consumer drones lack the necessary swarm-capable flight controllers and RTK GPS precision for synchronized fleet flight.
What is RTK GPS in the context of drone shows?
Real-Time Kinematic GPS provides centimeter-level positioning by correcting satellite signals using a ground-based reference station.
Which software is used to design drone animations?
Professional choreographers typically use 3D modeling software like Blender or Maya paired with swarm-specific export plugins.
Do I need a special license to run a light show?
Yes, in the US you need a Part 107 certificate and a specific waiver to operate more than one drone at a time.
How many drones are needed for a basic show?
While 20 drones can create basic patterns, at least 50 to 100 are usually required for recognizable 3D shapes.
❓ Frequently Asked Questions
What makes a light show drone different from a standard hobbyist drone?
Light show drones are purpose-built without cameras to save weight, featuring high-intensity RGB LEDs and specialized flight controllers that support swarm protocols. They are designed to receive high-frequency coordinate updates from a central Ground Control Station rather than individual pilot inputs.
How does the software prevent drones from colliding in mid-air?
Collision avoidance is handled during the design phase where software calculates safe buffers between flight paths. During the show, the Ground Control Station monitors real-time telemetry and can trigger emergency ‘return-to-home’ or ‘land’ commands if a drone deviates from its path.
What are the primary legal hurdles for drone light shows in the US?
Operators must obtain an FAA 14 CFR § 107.35 waiver for multi-aircraft operation and often a § 107.29 waiver for night flight. Additionally, local permits and coordination with Air Traffic Control are required if the show is near controlled airspace.
How do you translate a 3D animation into a drone flight path?
Animators create a sequence in 3D software where each vertex of an object represents a drone. This data is then processed through a compiler that converts XYZ coordinates and color timing into waypoint files compatible with the fleet’s Ground Control Station.
What environmental factors impact the success of a drone show?
Wind speeds above 15-20 mph can disrupt positioning, and high electromagnetic interference can break the link between the drones and the GCS. Temperature also plays a role, as cold weather significantly reduces battery flight time, requiring tighter show scheduling.
What is the typical cost of professional-grade swarm drone hardware?
Commercial swarm drones generally cost between $1,000 and $2,500 per unit. When including the RTK base stations, Ground Control software licenses, and charging infrastructure, the initial investment for a 100-drone fleet often exceeds $150,000.

Similar Posts